
Sticky Dates Printer Setup
Connect your printer and load your first label roll.
Sticky Dates Printer Setup
How to set up your new Sticky Dates printer
What's in the box
Every Sticky Dates printer comes with the following contents:
- 1 x Sticky Dates Printer
- 1 x Power Cable & Adapter
- 1 x Complimentary roll of ‘7 day a week’ labels
Preliminary Setup
Please take note of the StickyDates printer’s identification slip which was provided with your machine. This slip provides key details specific to your printer, and should be stored safely. We recommend taking a photo of this slip for later reference if needed.
Your identification slip will look similar to the below:

Your Sticky Dates printer has already been linked to your Sticky Dates account by our Support Team. Be sure to have your Welcome Pack email at the ready so that you may access your account and begin printing!
PhysicalSetup
Open the Sticky Dates printer lid by pushing the release button at the front of the machineand then lift the lid to expose the roll wheel housing.
Affix the desired label roll to the roll wheel housing, ensuring the labels are facing upwards.If you are using small size label rolls, ensure the label roll sits firmly to the left of the roll wheel housing and fit the provided reel guide from the right to set it in place.
PleaseNote: The reel guide is not required for large size label rolls. Please remove the reel guide by sliding it off the roll wheel housing and store it in a safe location for later use.
Align the end of the label roll by threading it between the guides at the front of the machine. Reduce the width of the guides as needed depending on your label size:

Once your label roll is secured, firmly close the Sticky Dates Printer lid until an audible click isheard as the release button locks back into place.
Ensure the Sticky Dates printer power switch is Off (O is Off, | isOn) and then connect the supplied power cable to the adapter and plug into therear of the printer:
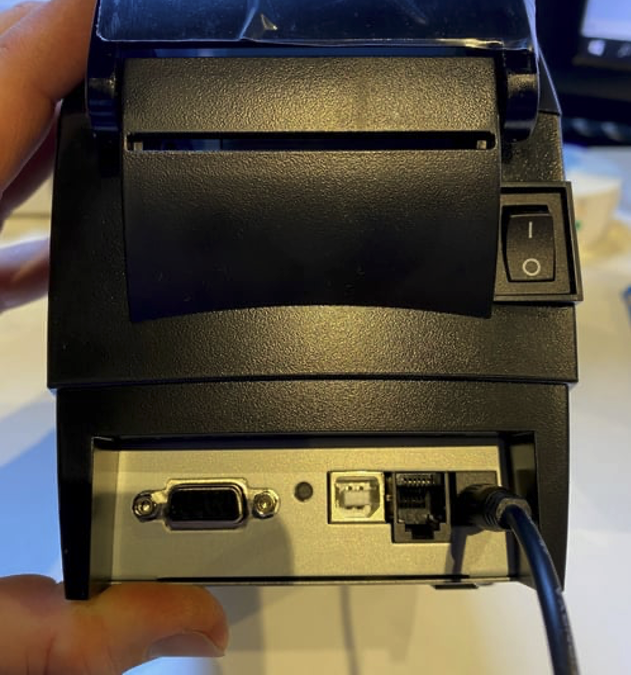
Plug the power cable into a wallsocket and turn the switch on, then flick the Sticky Dates printer power switchto On (|):
Caution: Onlyuse the supplied power cable and adapter when connecting your Sticky Datesprinter.
The ‘Online’ lighton your Sticky Dates printer will turn blue, and the printer will then begin toautomatically adjust the attached label roll to the correct position inpreparation for printing:
Continue to check out the NextSteps to begin using and printing from the StickyDates app or website!
ChangingLabel Rolls
Swapping to a different labelroll is quick and convenient, however your Sticky Dates printer must bere-calibrated if you are installing a different label roll size.
Begin by removing the old labelroll by pressing the release button on your printer and simplylifting the old label roll and the roll wheel housing. Slide theold label roll off the roll wheel housing (and the reel guide ifapplicable), then slide on your new label roll with the labels facingupwards.
If you are fitting a small sizelabel roll, fit the roll wheel guide onto the roll wheelhousing once again and ensure the label roll is aligned to the left.If you are using a large size label roll, store the roll wheelguide in a safe location for later use, as it does not need to be attached.
Thread the new label reelbetween the guides and close the printer lid. If you haveinstalled a different label size, your printer must now be re-calibrated. Withthe lid closed and the printer powered on, press and hold the Pausebutton to perform the calibration. This should take only a few secondswhile your printer adjusts, and then you're ready to go!
Please note: Ifyou change the label size in your printer then you will need to recreate yourlabels using the new width.
NextSteps
Download the App
You can print directly from yoursmartphone or tablet to your newly connected printer! To download the StickyDates app, simply search ‘Sticky Dates‘ on the GooglePlay Store (for Android) or the Apple App Store (foriOS):
